Saturday, October 5, 2013

October Giveaway!


To promote my latest children's book, My Massachusetts
we're hosting a really fun event that will be super easy to participate in! 


We're hosting a "Virtual Halloween Costume Parade" 
in honor of the famous annual Salem Halloween Parade! 


We want to see you and your trick-or-treaters looking spooky, funny, clever, creepy, creative...! Adults, kids, pets, you're all invited! All you have to do is like us on Facebook (hey, you're halfway done!) then post your photo to the Pinterest board or on our FB wall.

One lucky winner will be selected at random to win a FREE copy of My Mass. 
AND a print of the "Halloween in Salem" spread from the book.

Have fun and we really hope to see you all "marching" in our parade, this will be fun! 

Follow the link here for all the details and to enter (it's super easy!): http://www.littlebeachbooks.com/1/post/2013/10/october-giveaway.html

You can also enter RIGHT HERE below:


This will be so much fun if you all participate!! We can't wait to see all your fun costumes!
Oh--and they don't have to be from this year! The giveaway will end on Nov. 5th so you have time to upload your pics from this year, but we'll welcome old photos, too, if you have an old favorite!


Saturday, September 21, 2013

A Peek into the Process!

It's been forever since I've had a chance to update this blog! I feel a little bit terrible about it! But I now have some time since my latest children's book, My Massachusettsis finally here!!  I'm excited for everyone to see it, this was a fun and challenging project, with lots of great things about Massachusetts to discover and illustrate.

I thought it might be interesting to show you a peek into my process of painting these book illustrations, and share a step by step from one of the pieces in My Massachusetts.  So here we go!

*  *  *  *  *  *  *  *  

It all starts with a small thumbnail sketch to get the general initial idea down from the text that goes along with it.  There are a couple more rounds of sketches from there, each time getting larger and more  worked out, until reaching the full scale version--defined, detailed, and ready to transfer to the real deal.  

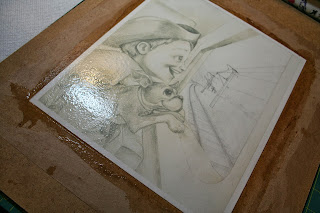
Below is the finished sketch for this page (page 7 in the book).  
Done with 2B graphite pencil on a toned drawing paper:
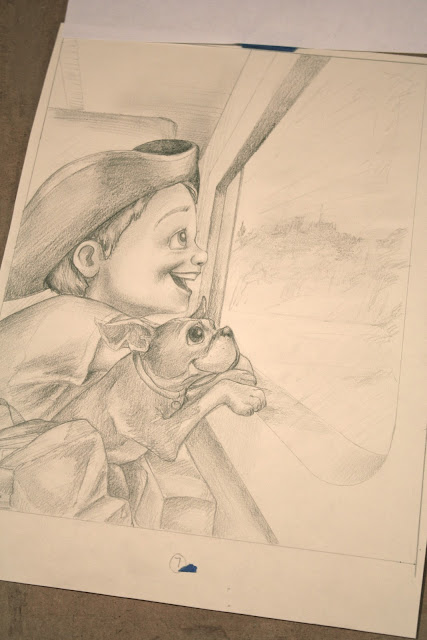
Final sketch drawn at 100% scale for book, including bleed area (8.5"x10.5")
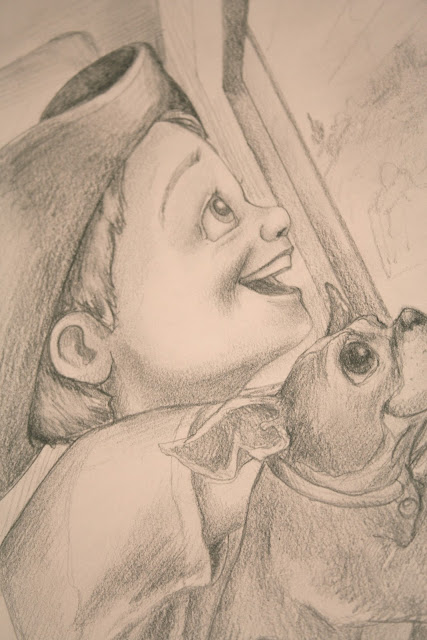
Detail of pencil sketch.

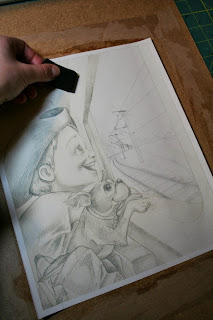
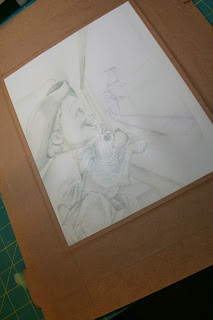
Next, I scan my sketch.  I lighten up the image and any imperfections in Photoshop, then print my sketch directly onto the watercolor paper, to be used as an under-layer for the painting.  I print the sketches on watercolor paper at 100% scale on a large Epson printer (thanks for letting me use your awesome printer all the time, dad!).  

In this case, I drew in a revised view in the window after the printing, but here it is after being printed on my watercolor paper.  I use Arches 140 lb Hot Pressed (Hot Pressed is a smoother texture than Cold, which has more "tooth" and can snag the fine tips of the pens that I use later).


Before I start painting with my watercolors, I have to prep the paper so that it remains flat, since the moisture of the water makes the paper warp and ripple, which can be frustrating while working and make the watercolor washes become pooled and inconsistent.

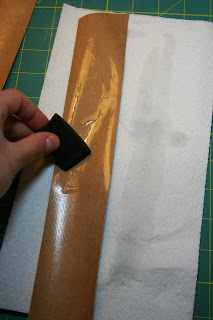
Below is my preferred technique for a "quicker paper stretch".  There are other ways of stretching watercolor paper, which traditionally involves soaking the paper for a longer period of time...I'm far too impatient for that, I've tried it!

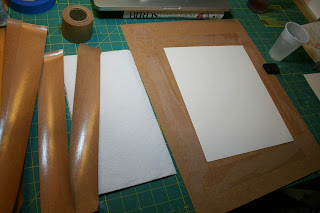
1. I use brown adhesive-backed tape, a large hardboard panel, some water and a sponge or two...and lots of paper towels.  Cut the strips to fit each side of the paper and then some.

2.  Then I evenly soak the back side of the paper with water and a sponge...

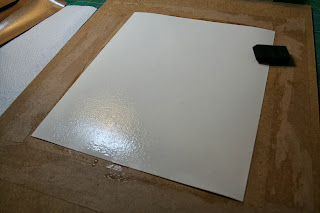
3.  Turn it over and do the same to the front.  Each side needs to be pretty wet.

4.  Once wet, it should stick pretty well to the hardboard. Smooth out any air bubbles and soak up any excess water on edges of the paper and board. 

5.  Dampen the water-activated adhesive side of the brown tape (a fine line between not enough and way too much water here, I've learned).  I wet one or two strips at a time so they don't dry up before being placed.

6.  Place each strip, wet side down, half on the paper's edge and half onto the hardboard. If there's not enough paper covered, it can pull up from the edge of the paper as it dries, defeating the while purpose of "stretching" it (I make this mistake a lot, seen above!).

7.  We wait! Let the paper dry completely. As the paper dries, the tape evenly pulls and tightens the paper, much like using staples would in the more traditional method of stretching watercolor paper. It's important to let this dry 100%, though, or the tape won't stay put and you won't get an even and flat painting surface.

Now that the prepping is done and the paper is dry, I leave the brown tape right on there while I paint to keep my paper flat. I used to use artist tape or blue painter's tape, but I've found that this brown tape works much, much better, and I use a lot less of it. Love this discovery and wish I'd tried it sooner!

Before I start painting, I cover up and areas that I want to preserve using blue painter's tape and liquid masking fluid (one of my can't live without studio staples and favorite things!). This keeps the watercolor from reaching the covered areas, which will either remain white or be worked on later in separate sections.

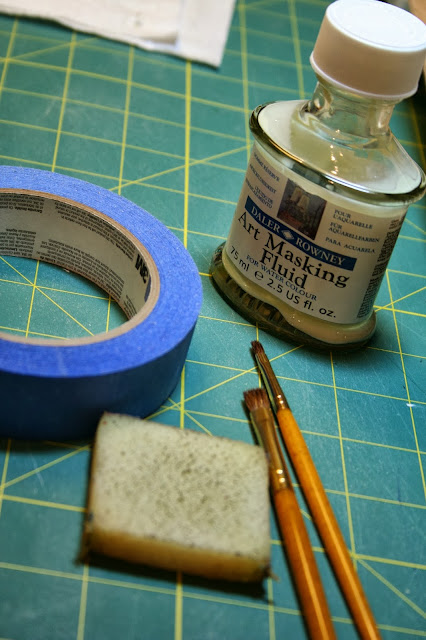
Masking fluid is applied with small, cheap (usually get thrown out after a few uses) brushes, and removed by fingers or rubbing gently with a rubber cement square.

This shows the areas with blocked off areas or edges. The masking fluid dries kind of yellow, but as long as it's removed in a timely manner it doesn't stain the paper at all.

 Once the masking fluid is completely dry, I can start laying down my first layers of paint! 
I also always give the whole page a clear water wash before even masking anything off, just to give the paper one last evening and prep for paint. This also helps to prevent the tape and masking fluid from pulling up the paper when it's removed.


I like to start with the largest areas to cover, and work my way in and smaller, ending with detailed areas, like faces.  In this case, I did the interior walls and chair of the train, then worked on the window view.


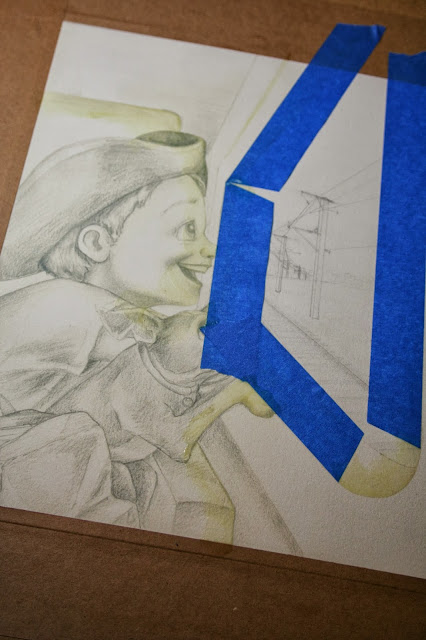
I keep masking new areas as I go, here you see above, the white of the hat, eyes and teeth are being preserved...and look kind of creepy!


I tend to jump around a lot. If I feel compelled to jump into some detail, I'll go for it before finishing another large wash area.


Above is the basic watercolor painting layer finished. I did a fair amount of shading with the paint on this book, then kept the pen and ink work to just outlining and some hatching for extra depth and detail.

For the final layer, the pen and ink portion, I work with color liquid acrylics and Rapidograph pens. They come in many tip sizes and are refillable, which I love because I can use any color of ink. I like to use the especially tiny tips.  Below is the finished piece.


And then I do that 20 or so more times until every page is finished!


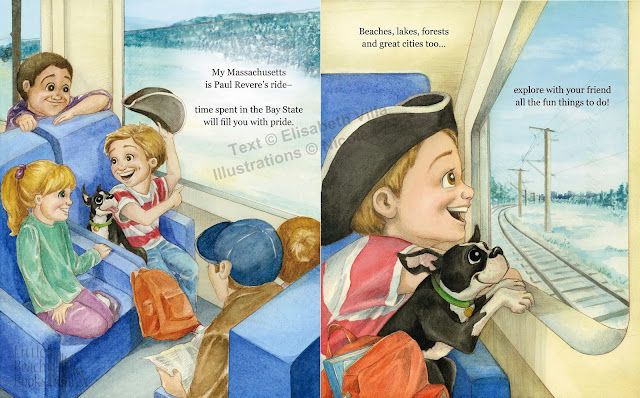
Here's the finished product as seen in the spread on page 6-7 in the book, My Massachusetts!
  

Here's another bonus image, because I think it's fun seeing the pieces while still in progress. This one is from the end of the book, window view complete, foreground untouched:


I hope you enjoyed this little glimpse into my process!

To see it in person, be sure to check out My Massachusetts
available now at LittleBeachBooks.com.


Thursday, November 29, 2012

Introducing- Red Shed Honey!

This is a delicious logo that I recently completed for my clients, who also happen to be some long time friends!  This new honey business is located in Scarborough, Maine, where three wonderful folks are making the most delicious honey with their busy little honey bee family.  Red Shed Honey is available for purchase now through the family directly, and will soon be for sale in stores and markets locally here in Southern Maine.  As soon as I have more info on details of where and when, I will be sure to share that info with you all.  Believe me, it's amazing stuff, you're going to want to go get some of this sweet local goodness!  I will also share their website and Facebook contact info as soon as those are up and running, as well.

When we started the logo design process, beekeepers Gretchen, Margo and Miguel invited me out to the "red shed" to check out their process and see the honey harvesting first hand.  It was so interesting and fun to see it all in action––not to mention getting to taste the first batch of this deep red bamboo honey and chew on the waxy, sugary, honeycomb bits!


Monday, November 5, 2012

Community Counseling Center, Rock Path Commission


This is one of the big--literally, big--projects that I was working on in October! I was contacted by the always amazing folks at the Community Counseling Center here in Portland.  Me and my sister, sister-in-law and several friends and family members, including my mom, worked on a mural here at CCC last summer (read more about that project here!). It was a really fun experience volunteering to make this room a bright, welcoming, and safe space for kids to meet with their counselors when they come in.  It was a great success, and we were all so thrilled at the response that it has received!

CCC Mural 2011
I was happy to hear from CCC again, regarding a commissioned art piece for another wall in the kids' wing.  This is a piece that they had been looking forward to creating for several years, so I was honored that they thought of me to work with them in making it happen.  The concept is part of a program that they offer for youths of all ages, and when each person completes the program, they receive two polished stones: one to keep, and one for CCC to keep.  On these two stones, participants wrote a word or two, or drew a small image, whatever they chose to represent their feelings after "graduating" from the program.  The Community Counseling Center wanted to arrange the stones in a path-like formation, where participants of the program could leave their stones as part of the on-going path toward healing and hope.

We settled on a design that would incorporate water, as well as the path itself, with larger "stepping stones" surrounded by the kids' smaller stones.


It's quite large, on a plywood board measuring 3.5' x 4'.  I started by prepping the board white and drawing out the general plan in pencil.  Then I went in with the background painting; we wanted something that would act as a piece of art on its own, while more stones could be added through the years.


For the large "stepping stones", I carved the shapes from styrofoam, prepped with Gesso and painted them to look like rocks.


Then, using a template of printed words that I typed up using some key words chosen by a CCC project leader, I painted the words onto the stones in white. "Hope–Healing–Community." I traced over the words on top of a layer of transfer chalk, pushing down to get a template transferred onto the styrofoam, which also embossed it a bit.


I used a pebbled/stone textured spray paint for the background of the path itself, which gave it some nice texture.  I went over it after it dried, sponging some darker and brown areas for variation and depth into the distance.

Taped off painted areas before pebble spray was applied.

Once the ground texture was sprayed and the rocks were placed, I painted some more stepping stones going off into the distance to complete the path.


It was quite moving to read all the words and see the images that the program participants had shared.  It really is such a reflection of the amazing work being done there, and the strength and support provided by the staff at CCC, and it was an honor to be a part of this project.


I used white molding to create the frame, then glued on all the large faux rocks and small stone mementos to create the community-built path.  The smaller stones fill in the path around the large message rocks, and the ones we had so far were placed in groupings, demonstrating how they will be able to fill in more wherever they'd like, as the program continues on.


I delivered the piece today, and was so happy to see how much the staff liked it and appreciated it! I don't have a full image to share, above is the best I could do from home. I hope to update with a photo of it hanging in the kids' wing when it is up!


Tuesday, October 30, 2012

Updates!

Hi everyone! I feel like it's been such a long time since my last post, 
I think it's been a couple of months! 

It doesn't mean that I haven't had any new interesting projects to share, it's the opposite! I've been super busy lately with lots of new work and just haven't had a moment to post about them. I'll be sharing a couple of them very soon, once they have been finalized and turned in to their recipients/clients. Some are gifts, others commissions and graphic design jobs. A little bit of everything this past month.

I've also been very busy on a new children's book!! I shared the news on Facebook, but not on this blog––oops!

I'm working with wonderful Little Beach Books again, the publisher of My Maine. The next one is called My Massachusetts, and I've been working away at the sketches for this new book over the past month or so. I'm really excited about it and can't wait to be able to share some images with you all soon. The book will be available in early summer of 2013, so mark you calendars! It's going to be a fun tour around Massachusetts by a young boy and his little Boston Terrier friend, covering everything from Martha's Vineyard to the Basketball Hall of Fame, Boston to Salem, and more!

More posts coming soon!

-Nicki-

Thursday, September 6, 2012

Book Signing this Saturday!


 Incase you needed another reason 
to come to the book signing at 
Lovely Things this Saturday--


We'll have sea glass themed cupcakes by Chefette Toni!!


Saturday, Sept. 8th

2-4:00 

Lovely Things 

Fore St., Portland, ME

I'll be signing copies of both Journey of the Sea Glass & Down East in the Ocean. Stay and have a sweet treat and do some shopping in this beautiful and unique store! See you there while supplies last! ;)


http://www.lovelythingsstore.com/


Books and shopping and cupcakes, oh my!